Sunday, July 31, 2016

How to recover deleted text messages on your Android phone


recover deleted text messages

MobiKin Doctor for Android

If you've accidentally deleted all your SMS messages – or even just a single, important message – you need to act fast. Lost messages are recoverable, but only until the portion of memory on which they were saved is over-written by an app update, file download or similar. So grab your phone and your computer and learn how to recover deleted text messages on Android.

If you've lost or deleted your text messages then the fastest way to get them back is to get a quality program that quickly recovers them. MobiKin Doctor for Android is a top-notch system that quickly and effectively recovers all of your text messages.
The most important feature to a text message recovery program is compatibility and  for Android MOBIKIN DOCTER FOR ANDROID.APK supports over 2,000 Android device models. This innovative program can be used with HTC, Samsung, Motorola, LG, Sony, Asus and many more brands


    How to never lose a text message again

    Maybe you've learned your lesson, maybe you haven't. If you want to avoid the panic of losing your messages and using a PC to recover them, the best thing to do is to back up your SMS messages regularly. The good news is, doing so only takes five minutes.
    I use a free app called SMS Backup & Restore. It's straightforward, looks nice and works perfectly: all you need for this type of operation. Check out the screenshots below for the walkthrough.


    How to back up Android and keep your data


    MobiKin Assistant for Android


    Backups are indispensable. Whether it's a backup of your Android smartphone, your photo albums or your laptop PC, backups come in at just the right moment to save the day. There is nothing worse than losing everything on your phone or computer and realizing you never backed anything up. So here are a few methods for making an Android backup.

    MobiKin Assistant for Android

    Dowenlord Mobikin.exe for you' r  PC


    Follow the few steps after downloading and your data will be safely backed up and your phone will have more free memory. 

    Google backup

    As you probably know, Google is more than willing to help keep all your apps and data safe. If you go into your phone's settings, you'll find a section called Backup & Reset. In here you'll find an option for backing up your data, including Wi-Fi passwords, preferences and app data. All of this will be tied to your Google account, which you can set to automatically restore when you re-install an app.


    App backup (for non-rooted phones)

    There are plenty of useful backup solutions in the Play Store. Some for specific purposes like backing up your text messages and others for an all-in-one backup. Easy Easy Backup & Restore is a free app that lets you back up your contacts, call logs, text messages, calendars and bookmarks.

    Easy Backup doesn't back up your photos, music, videos or documents. These are very easy to back up yourself though using a USB cable and your computer: just locate the appropriate folders on your phone in a Windows Explorer window and copy and paste the contents to your computer.

    1. Download Easy Backup on your Android device.
    2. When you launch the app, you'll be asked if you want to create a backup. Tap Yes.
    3. You'll then see a bunch of check boxes next to the things you can back up: SMS, MMS, call logs, calendar, bookmarks, dictionary and contacts. Make your selections and tap OK.


    4. You'll be asked for a save location for your backup. Make your selection and tap it.
    5. If you select a cloud service you'll have to sign in. If you select SD card you'll have to confirm the directory.


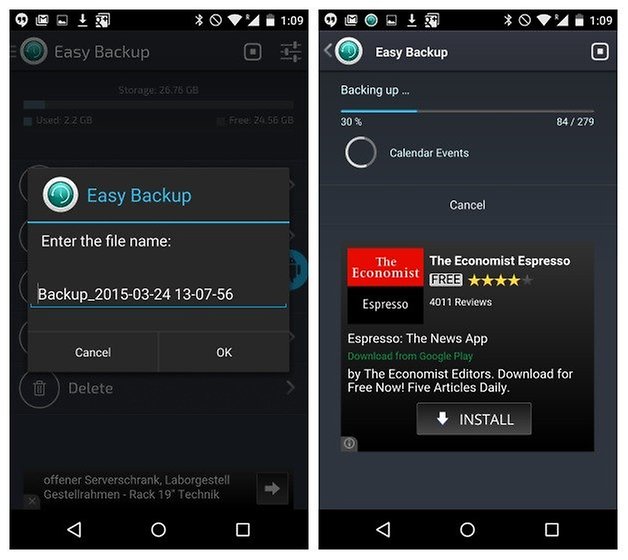
    6. You'll then be asked to give the backup a file name. The date and time is the default. If you have multiple devices you might want to modify the file name to include the device you're backing up.

    7. You'll then see a progress page when your data is being backed up. Once completed, you'll get a pop up window with a summary of what was backed up


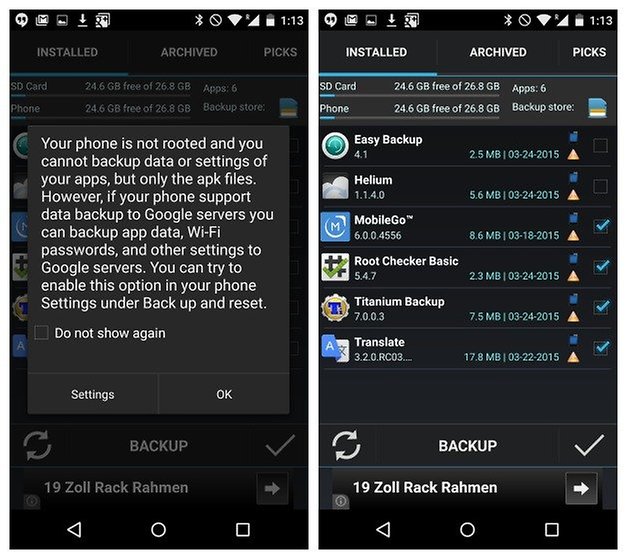
    8. If your phone is rooted, you can also back up your apps and app data. If not, you can still tap on theApps Tools tab in the main menu and create a backup of the APKs on your phone. APKs are like an .exe on a computer: it's the program or app package. If your Google settings are enabled to back up your app data and settings (outlined above) you can use this option to back up the apps themselves and Google's backup to save the settings and data in the apps.
    9. Just check the boxes next to the apps you want to save and hit Backup at the bottom

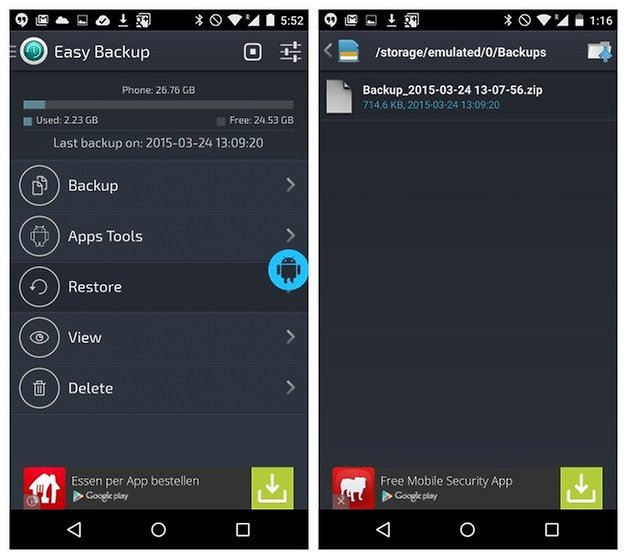
    10. When you want to restore your apps or data, just hit the Restore tab. You'll be prompted to set Easy backup as the default SMS app. You can change this back once your backup has been restored

    11. Select the backup you want to restore and tap it. You'll see a pop up with details of what will be restored. Tap OK and you're done.

    12. Restoring your apps is slightly different. Go back to Apps Tools in the main menu and tap theArchived tab.
    13. You can check off the APKs you want to restore, then tap Install at the bottom.
    14. You'll then see the permissions screen for each app, like you would with any new app you install.

    thank you

    Android 6.0 Marshmallow

    Android Marshmallow isn't an overhaul of everything you thought you knew about Android. Rather, it's a refinement and extension of the core features and functionality of Android Lollipop. In this Android Marshmallow review, I take a look at the major features of Google's latest OS version to let you know where it hits, where it misses, and where it has room to improve.


    1. Uninstall apps from your home screen or app drawer

    In Android Marshmallow you can now uninstall an app on your home screen or in your app drawer simply by long-pressing it. At the top of the screen you'll now see options for Remove or Uninstall on the home screen, or App Info and Uninstall in the app drawer. Simply drag the app icon to the one you want.
    This is a neat way to save a few seconds over uninstalling apps in older versions of Andoid. r


    2. Activate Developer options

    Developer options are nothing new, but there are a few new ones in Android Marshmallow. To access Developer options, go to Settings > About Phone and tap Build Number seven times until a toast pop-up notifies you that you are now a developer.
    Back up a step and you'll see Developer options listed right above About Phone. This is where you can enable USB Debugging, OEM unlocking or Show touches, tweak animations or access some of the other tips below.

    3. Grant app permissions individually

    Granular app permissions was the holy grail of the Android Marshmallow release. We all hoped it would pan out but no one really believed it would. We had always been told that denying specific app permissions within a third-party app could break it.
    Now, however, Android lets you manage app permissions individually, without developers having had to do anything, and everything seems to work swimmingly.
    To access app permissions, go to Settings > Apps and tap an individual app to see its permissions. Then simply flip the switch for the permissions you do or don't want to grant it.
    You can also view a list of permissions to see which have been granted to which apps. Just go to Settings > Apps, then tap the overflow menu in the top right corner and go to Advanced > App Permissions.

    4. Customize Quick Settings using System UI Tuner

    To enable the System UI Tuner, bring down your Quick Settings menu (swipe down from the top of your phone with two fingers) and tap and hold the settings button (cog wheel) for five seconds. When you let go you will be asked if you would like to enable System UI Tuner. Select yes and you'll see System UI Tuner at the bottom of your Settings list.
    In System UI Tuner, tap Quick Settings and you'll see a mockup of your Quick Settings shade. You can add tiles (press the + at the bottom), move the toggles around (tap and drag) or delete toggles (tap and drag to the bottom). Your changes will be reflected in the Quick Settings menu.


    5. Get to know RAM Manager


    Android Marshmallow is all about giving us even more power over our beloved Androids, and RAM is a huge part of that. Go to Settings > Memory > Memory used by apps, to see a list of all your memory-hogging apps.
    Tapping an entry will show you detailed info and give you the option to force stop the app if necessary. Take some time to familiarize yourself with this part of your Android – it's a great tool to help you understand what RAM usage is normal and what's out of the ordinary.


    6. Find your Downloaded, Running, All and Disabled app 

    he RAM Manager is also effectively the new home for the 'Running' tab that was in previous versions of the Settings > Apps section. Unlike previous Android versions, Android Marshmallow doesn't break your apps list down into tabs for 'Downloaded', 'Running', 'All' and 'Disabled'.
    The 'Running' tab now appears as RAM Manager; 'All' and 'Disabled' are now options in a drop-down menu, accessible once Tyou've disabled at least one app. The default view in Settings > Apps is the 'All' apps tab. We'll have to wait and see how devices with SD cards display the information that was previously found in the 'SD Card' 

    7. Automatically associate links

    Android Marshmallow allows you to automatically associate specific apps with specific types of links. So if someone emails you a Twitter link, for example, you can set Twitter as the default app for opening such links, rather than picking from a list every time.
    Although you could set certain apps as default apps before, the system didn't work all that well. Now you can associate specific domain URLs with an app of your choice. For example, all facebook.com links can be set to open either in Facebook, Tinfoil or another third-party Facebook app automatically.
    To do this, go to Settings > Apps, then tap the overflow menu at the top right and go to Advanced > App Links, then flip the switch for the apps that you want to set to automatically intercept links from specific domains.


    8. Ignore battery optimizations

    Doze is pretty cool: it activates when your phone is left idle for a period of time, while unplugged and with the screen off. It will stop some CPU and network activity operating in the background for some Android apps, thus saving battery. 
    You might not like it in every scenario though. Doze mode can interrupt the background activity of your apps in order to make these battery savings. So if you don't want this to happen to certain apps, you can disable Doze mode to keep these apps running. Follow the steps below to switch off the battery saving functionality of Doze
     You can now select any apps for which you'd like to disable Doze mode.5. Select Don't optimize and then Done. Now you're set up.Now the apps you've selected won't have Doze optimizations, just as you'd prefer. Let us know in the comments section if you see changes to battery life or app activity as a result of Doze, and if you think Doze is a good addition to Marshmallow.

    9. Activate Google Now from the lock screen

    You might have missed this one, but the lock screen shortcut to the dialer has been replaced by Google Now. This is a welcome change; you can use Google Now to call someone just by speaking (along with plenty of other things), so you haven't lost out on functionality by losing the dialer shortcut.
    Simply swipe from the bottom left-hand corner of the lock screen to get Google Now ready to receive your voice command.
    10. Enjoy Google Now on Tap
    Google Now on Tap is easily my favorite feature in Android Marshmallow. It brings Google Now functionality to every part of your phone or tablet.
    There's no need to switch apps or copy and paste phrases anymore – once it's enabled, you can bring up Google Now on Tap from any app, simply by selecting text and long-pressing the Home button

    ....thank you....